This is an old revision of the document!
Table of Contents
Paspberry Pi Pico
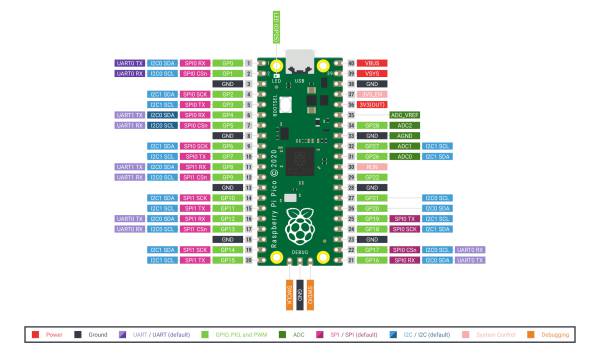
Pinout
Micro Python
Plug in the RP Pico with pressed BOOTESL button Download Micro Python for the RP Pico:
wget "https://www.raspberrypi.org/documentation/rp2040/getting-started/static/f70cc2e37832cde5a107f6f2af06b4bc/rp2-pico-20210205-unstable-v1.14-8-g1f800cac3.uf2"
Copy it to the RP Pico
MicroPython on Command Line
start minicom
$ minicom -o -D /dev/ttyACM0
press Enter
 >>> from machine import Pin
 >>> led = Pin(25,Pin.OUT)
 >>> led.high()
 >>> led.low()
To leave minicom: Ctrl+A, Z, x
MicroPython in Thonny
Install Thonny:
yaourt -S thonny
Select Micro Python (Raspberry Pi Pico) on the bottom of the IDE or in Tools/Options/Interpreter.
Run blink:
import machine
import utime
led_onboard = machine.Pin(25, machine.Pin.OUT)
while True:
    led_onboard.value(1)
    utime.sleep(5)
    led_onboard.value(0)
    utime.sleep(5)
And the first audio code, if one connects a wire to ADC 0 one get the simple Theremin:
import machine
import utime

led_onboard = machine.Pin(25, machine.Pin.OUT)
led_onboard.value(1)

sensor_poti=machine.ADC(0)
sound_pin=machine.Pin(15, machine.Pin.OUT)
while True:
    reading=sensor_poti.read_u16()
    # values from 304 to 65535
    # print(reading)
    pitch=reading / 655350
    sound_pin.value(1)
    utime.sleep(pitch)
    sound_pin.value(0)
    utime.sleep(pitch)
Save it on the Pico
- for testing press F5 or the Run button
- Shift+Ctrl+F2 or the Stop button to stop again
- save the program as 'main.py' on the Raspberry Pi Pico
More sound with PicoBuzz by benevpi.
PWM
pwm=PWM(Pin(25))
pwm.freq(1000)
one can change the duty cycle, 0 to 65535
pwm.duty_u16(duty)
Interrupt
from machine import Pin

mypin=Pin(2,Pin.IN,Pin.PULL_UP)
mypin.irq(lambdapin:print("IRQ with flags:",pin.irq().flags()),Pin.IRQ_FALLING)
or
mypin.irq(trigger=machine.Pin.IRQ_RISING, handler=myTask)
Multicore
 import _thread

 _thread.start_new_thread(Blink, ())
Synchronize two threads with allocate_lock()
baton = _thread.allocate_lock()
in the threads
 baton.acquire()
 ...
 baton.release()
taken from Andreas Spiess on youtube
Programmable I/O
In-depth: Raspberry Pi Pico's PIO - programmable I/O! by stacksmashing
The RP Pico has eight state machines (0-7) including these parameters:
- state machine number
- PIO program
- frequency (between 2000 and 125000000)
- GPIO pin
These mini programs run on the PIO state machines and run continuously.
from rp2 import PIO, StateMachine, asm_pio
from machine import Pin
import utime

led_onboard = machine.Pin(25, machine.Pin.OUT)
led_onboard.value(1)
utime.sleep(2)
led_onboard.value(0)

@asm_pio(set_init=PIO.OUT_LOW)
def faint_led():
  set(pins, 0) [20]
  set(pins, 1)

sm1 = StateMachine(1, faint_led, freq=10000, set_base=Pin(25))

while(True):
  sm1.active(1)
  utime.sleep(1)
  sm1.active(0)
  utime.sleep(1)
The commands set(pins, 0) and set(pins, 1) turns the GPIO pin on and off.
In square brackets are numbers between 1 and 31 to pause this clock cycles
The @asm_pio descriptor above the function takes the set_init parameters.
To start and stop the state machine use the active method (1 or 0)
The Nine State Machine Instructions
- in – Shifts 1 word of 32 bits at a time into the ISR
- out – Shifts 1 word of 32 bits from the OSR e.g. out(pins, 4)
- push – Sends data to the RX (input)
- pull() – gets data from the TX (output),e.g. sm1.put(1234)
- mov() – moves data x or y in register, e.g. mov(y, osr) osr=output shift register
- irq – Sets or clears interrupt flag e.g. irq(rel(0)) in python: sm.irq(myFunction)
- set() [] – Writes data to destination, 0=off, 1=on, delays 0 to 31 circles
- wait – Pauses until a defined action happens
- label(“mylabel”) and jmp (condition,“label”) – Jumps to a different point in the code
Some more Instructions
- nop () [] - no operations, delays 0 to 31 circles
- wrap_target() and wrap () - resets program counter and starts over again
- lable() - sts a lable label(“end”)
- jmp () - jumps conditions:
_ jump if zero: jmp(not_x, “end”)
_ shift the register, jump if not exhausted: jmp(not_osre, “lable1”)
_ decrements, jump if not zero: jmp(x_dec,“label2”)
Example by Tinker Tech Trove
and on Github
RP2040 Datasheet, Chapter 30, page 330 following
Seeedstudio: Programmable I/O with Raspberry Pi Pico by Jonathan Tan

